From time to time I find that I need the specific RGB - red, green, blue - codes for colors. This is useful in graphic design, presentations, and any situation where color coordination is needed.
This post review different apps for writing on the iPhone. Apps discussed are Notes, Microsoft Word, Apple Pages, and Google Docs.
Recently I came across an e-book written by Andrew Mayne, a television personality and author. In How to Write a Novella in 24 Hours, Mayne offers general writing advice on a several different topics. In one of the chapters, Mayne discussed how he uses his smart phone to write.
Writing Tools
Prior to the advent of computers there were really three ways to produce words that would eventually result in a book. If you had a generous budget you could dictate your writing and pay someone to transcribe it. If you were lucky enough to have a typewriter, you could type your pages. Finally, if you didn't have a budget or a typewriter, you could simply write words on paper. Computers have largely eliminated these problems, but still have one characteristic in common: you still need to carry a tool with you.
This is often my situation. Sometimes I write using my laptop and sometimes using my iPad with Bluetooth keyboard. However, after reading Mayne's article, I decided to experiment with typing on my phone.
The advantage of using phone to create content is that it is immediately available all the time. Who is without a phone for too long? You can now write a few sentences when waiting in line. You can write between other activities. With a dictation feature, you can even dictate a few sentences into the writing app of your choice.
Apps
For my Writing 365 project, where I am writing 1,000 words per day during 2016, I have been using Microsoft Word for Mac and Apple Pages for iPad and Mac. At the same time, I have used Google Docs to create outlines for various documents.
Since I already have the apps for Word, Pages, and Docs on my iPhone, I decided to determine which would be best. I decided to use the classic speech, The Gettysburg Address, by Abraham Lincoln.
Microsoft Word for iOS
I first opened Word for iPhone, pasted the text of the speech and viewed the result. The default when both creating documents and opening existing documents is to display the text as a full page, and you have to scroll to view full paragraphs. There is a button to toggle between page view and text view, but because the default is the page view, this requires an extra step. The Word app also requires a Microsoft account to edit documents.
Apple Pages for iOS
Apple Pages provides the same basic app across platforms. While there is considerable additional functionality on the Mac, the iOS versions are still fairly powerful. Pages works well on the iPad, but has the same problem as Word on the iPhone. Unlike Word, I could not find a toggle button to switch between text and page views.
Google Docs
Google Docs defaults to the text view, with a toggle button to switch to page view. This is perfect for the iPhone. Since all three apps provide for basic formatting, including paragraph styles, Google Docs provides the best scenario: text view which is perfect for iPhone and basic formatting capabilities.
Notes
Notes provides basic text entry, but only offers limited style or formatting options (apparently with no way to modify the styles).
Google Forms is an easy and free way to create tracking logs and surveys you can access from your smart phone.
I recently learned about Google Forms from Andrew Mayne, an author and television personality. He wrote a blog post titled "My Secret Creativity Tool," in which he provided a quick overview of Google Forms.
I played around with Google Forms and decided to create the video below. This project took a couple of nights because I was dissatisfied with my first night's result. I realized that I said "so" far too much, something I previously blogged about. To help myself stay on track I created an outline. It seemed to help.
Another advantage of the outline is that it helped me write this post to support the video.
Google Forms
Google Forms is part of the Google productivity suite, which includes apps for documents, spreadsheets, and presentations. Although not nearly as powerful as Microsoft Office, Google's productivity suite is convenient because it already uses the same account information as G-mail, Google+, and YouTube.
Google Forms provides a platform to collect and organize information for free. These forms can be used for surveys, polls, and tracking logs. You are only limited by your imagination and the technical limitations of the tool.
One of the immediate applications of interest to me was a tracking log. I have previously written about a writing project in which my goal is to write 1,000 words per day each day in 2016. I am writing in four different categories, and enter my progress each day into an Excel spreadsheet. However, with a Google Form, I can track the same information simply by entering my writing progress into a form accessible on my phone.
In the video I used the example of an exercise tracking log.
Getting Started
The first step is to access Google Forms. If you don't already have a Google Drive set up, the easiest way to locate Google Forms may be to simply search "google forms" and select the first option. Click the + to create a form.
Analyze your results in Google Forms. Free from Google. Google Editors Docs Sheets Slides ... About Google Docs Google Docs; Google Sheets; Google Slides;
Another way to start a new Google Form is to go to your Google Drive home page. Click: New > More > Forms.
Enter a title and description of your form. Even if only creating the form for your own use, it is helpful to include a brief descriptions.
Adding Questions
Several different types of questions exist.
Multiple choice includes multiple choice where only one option is selected from displayed options, checkbox where multiple options can be selected, and dropdown, where an extra mouse click is required to display the options.
Free text includes short answer (one line) and paragraph (multiple lines).
Date/Time fields include date and time.
Rating scale choices are Linear (Likert) scale, for one item, and multiple choice grid, for multiple items, are also available question types, but don't seem as relevant for tracking logs.
Setting Up Responses
In order to make a form useful, the data must go somewhere. The easiest way to configure this option is to create a new Google Sheets spreadsheet using the same name as the form. On the Responses tab is a small green button which will create a spreadsheet.
Sending the Form
Three options to send the form include sending by e-mail, copying the link, and embedding the link. E-mail is the best option to easily transfer the link from computer to smart phone.
Before configuring the form on your phone, test the form by copying the link and pasting it into a new browser tab or window. As soon as you submit the form, the data is immediately loaded in the corresponding Google Sheets spreadsheet (which you can verify by navigating to the spreadsheet).
Use on Your Phone
Open the message that you sent from the Google Forms "Send" options and click on the link. The form will open on to your phone's browser (in my case, Safari). Using the Share button, save the link to your home screen. The form will now appear as a icon (just like mail, Instagram, Pinterest, etc.).
Now, whenever you click this icon, you will be taken directly to the form.
This is the second in a series of posts on travel-related websites. The previous post focused on TravelMath.com, while this post is about a fun mapping app, Great Circle Mapper.
In a previous post, I shared about TravelMath.com, a research site for travel. In the post, I used examples of a few cities in the United States that share names with much larger cities around the world. A
few examples with the closest airport (using Travel Math) and their sister cities are listed here:
Athens, Georgia (AHN) - Athens, Greece (ATH)
Paris, Texas (PRX) - Paris, France (CDG)
London, Kentucky (LOZ) - London, England (LHR)
Hamburg, Iowa (OMA) - Hamburg, Germany (HAM)
Venice, California (LAX) - Venice, Italy (VCE)
I first discovered these sites while creating a route map. I wanted to show direct flight paths between each city of origin and the destination city for a business conference. Several data mapping sites exist, but this one seems to focus more on airport and flight information.
Great Circle Mapper
According to the FAQ on the website, the primary purpose of the Great Circle Mapper is to display maps depicting the great circle path between locations and to compute distances along those paths. A great circle path is the shortest path on the surface of a sphere
between two points on that sphere. Technically, the term
geodesic path should be used since Earth is not a true sphere,
but the great circle terminology is common usage.
I like website that get right to the point, and this is one of those. At the top of the screen is a space to type in your airport information.
Using the airport information listed above, I typed in the following:
ahn-ath, prx-cdg, loz-lhr, oma-ham, lax-vce
The result was a map of the world depicting my origin and destination points. There are four basic map available: plain, light, Facebook, and blue marble.
A variety of display options are available. For example, it is possible to display various airport information from the three letter code to city, state, and country data.
The scale of the map is determined by the starting and ending points. If you map between two airports in New York, just that region of the country will be displayed. When you map several domestic (US) points, most of the United States will display.
Additionally, you are not limited to direct flight paths. After creating the maps above, I entered in new airport information:
ahn-prx-loz-jfk-oma-lax
The resulting map is below. This is probably neither an efficient nor desirable route, but serves the purpose of illustration.
Use TravelMath.com, an online app to find cost estimates, distances, and information about destinations, including the closest airport.
There are many towns across the United States that may be diminutive in size but share names with much larger counterparts across the world. A few examples are:
Athens, Georgia
Paris, Texas
London, Kentucky
Hamburg, Iowa
Venice, California
What is TravelMath?
I recently came across two websites helpful for travel planning. The first site, TravelMath.com, provides all kinds of helpful estimates,
cost, and distance data for traveling between locations. TravelMath.com describes itself this way:
Travelmath is an online trip calculator that helps you find answers quickly. If you're planning a trip, you can measure things like travel distance and travel time. To keep your budget under control, use the travel cost tools.
You can also browse information on flights including the distance and flight time. Or use the section on driving to compare the distance by car, or the length of your road trip.
Type in any location to search for your exact destination.
International example
Drawing from the city list above, here is information for a trip from Athens, Georgia to Athens, Greece:
Flight Distance: 5,629 miles / 9059 km
Flight Time: 11 hours, 45 minutes
Time Difference: Athens is 6 hours ahead
Airports near Destination: Athens International Airport Eleftherios Venizelos (ATH)
Colleges and Universities: Athens University of Economics and Business, Agricultural University of Athens, Panteion University, National and Kapodistrian University of Athens, andUniversity of Piraeus
Domestic (US) example
Now, let's check out a trip from Paris, Texas, to London, Kentucky:
For domestic travel, two options (flying and driving are presented).
Clicking on any field (such as Driving Time) will display more detailed information.
Finding an airport
I first discovered Travel Math because I was searching for the airports closest a list of cities for a work project. Travel Math makes it easy with the Closest Airport option. Staying with the list of cities above, let's look at the airport information for Hamburg, Iowa.
For each search, three categories of airports are displayed: international, domestic, and local. For Hamburg, Iowa, the top two in each category are:
Many options available
With options for driving, distance, flying, time, costs, and places, I am certain you will find helpful resources on TravelMath.com.
In this post I share about a project where I needed to combine multiple Excel worksheets into one using Visual Basic coding. The code combined 66 worksheets into 1 containing the entire King James Version of the Bible.
I have started to work on a book project which requires several texts from the King James Version of the Bible to be included. Rather than type each text into the book, I wondered if there might be a better way.
However, when I viewed the Excel workbook after downloading, I realized that each book of the Bible (a total of 66) was included its own individual spreadsheet. In ordinary circumstances multiple spreadsheets would not be a problem, but 66 spreadsheets - far too many.
Combining Multiple Worksheets
Thus, I returned to the Internet to search for some technique to combine multiple Excel worksheets into one. The best option I found is the one listed below. The Visual Basic code combines all of the worksheets into a new worksheet entitled "Master."
The code as written works well for the Microsoft Windows version of Excel. However, it only merged the first column of data on the Mac version of Excel. The Visual Basic code automatically calculates the number of columns to import. When I manually entered the number of columns (2 in my case), the code worked perfectly.
All of the worksheets should have the same structure with neatly arranged data and the same number of columns. A large number of worksheets takes a few seconds to process, but the end result saved a lot of time.
To help with my project of writing 1,000 words per day in 2016, I use
a Microsoft workbook to track progress. In this post you will see how I
created the various measurements.
In Writing 365 Track - Behind the scenes, Part 1 I shared how I use Microsoft Excel to track my writing progress. In Part 1, we looked at the Log and DailyCount worksheets. In Part 2, I will walk you through my Summary worksheet, which contains several tables and charts.
Word count by category
My writing this year fits into four categories: journal, devotional, blog post, and e-book. Theoretically, by the end of the year, each category should have at least 91,250 words. In the top left corner of the worksheet is a summary of the word counts for each category. The SUMIF formula is to calculate this (see Part 1)
Weekly word count
For each week (staring on Friday and ending on Thursday) the word count is automatically calculated using the SUMIF formula. SUMIF is an extremely convenient formula, which I use frequently. The columns in this table are week, actual (words), start date, and end date.
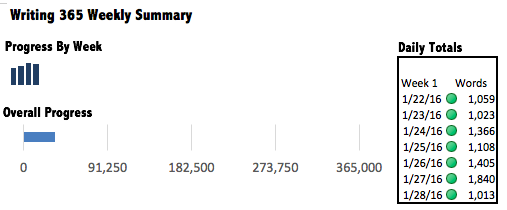
Writing 365 weekly summary
I post a weekly summary on this blog each week. Although I write the post on Friday, I delay publication until Sunday. For the Writing 365 portion of the summary, I put together the following chart.
It is a combination of three elements:
a bar chart depicting overall progress towards 365,000 words
a sparkline using columns which depicts the total for each week
summary of the week by day
BAR CHART
The overall progress bar chart is about as simple as charts come in Excel. I used the chart wizard to create a chart and eliminated everything but the essential elements. Everything in an Excel chart can be edited or deleted. Of the spreadsheet programs available (Microsoft Excel, Apple Numbers, Google Sheets, etc.) Excel is by far the most powerful from the perspectives of analysis and charting.
SPARKLINE
The sparkline data is pulled from the weekly word count table. A sparkline is different from traditional charts in Excel because a sparkline is designed to provide trending information while contained in only one cell. Sparklines options are line, column, and win/loss. In the image below, the Line and Column sparklines use the data from the Words column, while Win/Loss uses data from the Change column.
DAILY WORD COUNT
The word count table uses SUMIF to pull the daily word count from the DailyCount worksheet discussed in Part 1. I use conditional formatting to generate a red dot for days with no words, a yellow dot if any words have been written, and a green dot if the daily goal of 1,000 is surpassed.
Track your work
You don't have to utilize Excel or any spreadsheet application to track your writing goals. However, I encourage you to at least create a basic spreadsheet with columns for date and the number of words you write each day.
To help with my project of writing 1,000 words per day in 2016, I use a Microsoft workbook to track progress. In this post you will see how I created the various measurements.
In an earlier post I described the Writing 365 project. With an end goal of writing 365,000 this year, my daily goal has to be a minimum of 1,000 words per day.
I created a Microsoft Excel workbook to track my progress. Using four basic data points, each with its own column, I have created everything you see below.
Layout of the workbook
Microsoft Excel provides the ability to have multiple worksheets, also known as tabs. For this project, I have four worksheets: Summary, Log, DailyCount, and Lookup.
Log
The four fields I populate with data are the week, date, category of writing, and number of words. Each week starts on a Friday and ends on a Thursday. The date is fairly self-evident. The four categories of writing are devotional, journal, blog post, and e-book. I enter in the number of words as provided by Apple Pages (devotional and journal), Microsoft Word (e-books), and Mozilla Firefox (blog posts) using the Word Count Tool add-on.
VLOOKUP
When I type in the date, the week number is automatically populated using a VLOOKUP formula. This is a convenient way to keep a table of related data and pull various bits of information from it. To use VLOOKUP, you first need a table of data. In my case, this is a simple table located on the Lookup worksheet.
The formula reads: =VLOOKUP(B2,Lookup!A:B,2,FALSE)
What it means
Find the value in cell B2 (from my Log worksheet).
Take this value and find it in Column A in the lookup table.
When the matching value is found place the value from the second column (Column B) into cell A2 (Week) of the Log worksheet.
CONDITIONAL FORMATTING
For the Words column, I use the solid data bars from the Conditional Formatting options. Conditional formatting is an easy way to highlight cell values in comparison with one another or to highlight the highest or lowest number.
DailyCount
Using the SUMIF formula, I total the number of words per day and use this information to update a chart of my progress.
I entered a date (column A) for each the the 366 days in 2016 (this is a leap year). Using the Date, in column B, I wrote a formula to total the number of words for each of the corresponding entries on the Log worksheet. Typically, there are four entries (journal, devotional, e-book, and blog post) for each date on the Log worksheets. The SUMIF formula totals numbers if they meet certain criteria.
The formula reads: =SUMIF(Log!B:B,DailyCount!A3,Log!D:D)
What it means
Look at the entire column B (Date) on the Log worksheet and find values that match the values on the DailyCount worksheet (column A).
For any matching values, total the numbers.
DAILY COUNT CHART
Using the Excel chart wizard, I created a line chart with the number of words per day and my daily goal (1,000) words per day.
These simple tools help to analyze my progress and visual the results. In the Part II, I will discuss the Summary worksheet.
In this second of two posts, I review the Mindly app, a mind mapping tool based on a concentric circle design.
In Variation on Mind Mapping, Part I, I reviewed the Cell Storming app. It applies a honey-comb style of design to visual brainstorming and mind mapping activities. Mindly is another mind mapping app, and uses a series of concentric circles to arrange bits of information. The Mindly website describes Mindly as a planetary system with a central sun, series of planets, and orbiting moons around each planet. Ultimately, it is a hierarchical organizational system.
Mindly
Created maps and the option to create a new map are displayed on the home screen. After initiating a new map, you are prompted for the central idea or "sun," using the vernacular of Mindly. The central idea is set with a circle which displays four plus signs. You can add primary categories by clicking on the small plus signs. This same type of pattern continues throughout the multiple levels of organization.
Completed maps can be exported in Mindly format, a PDF, text outline, and image. Only the Mindly format and PDF are available in the free version.
Assessment
I like the idea of organizing in this format. Mindly provides the opportunity to display information visually in a new way. However, two details preclude me from downloading the full version.
First, I could not find an option to edit the font size. Like PowerPoint, Mindly's default appears to decrease the font size by organizational level. I would like to have the option to keep the font size the same throughout the map, and I would like to be able to increase the overall font size.
Second, the full version is $6.99. Given the lack of editing options, including no choices of image type on export, this is an app I will use sparingly, if at all.
In this first of two posts, I review the Cell Storming app, a visual
brainstorming tool similar to mind mapping.
Mind mapping
In a couple of previous posts I wrote about creating mind maps by hand and using an iPad. Mind mapping is a visual brainstorming and planning
tool that is extremely useful. The term "mind map" was coined by Tony
Buzan, but the general idea of using a series of branching nodes for visual outlining has been around for a while.
Cell Storming
In a recent search for new mind map apps I came across Cell Storming. It is
available for $1.99. The description from iTunes reads:
With Cell Storming you create mind maps (cell maps) by connecting hexagonal
cells together and then adding media elements to these cells. You can add
images, videos, voice memos, text, web links, files, and Address Book contacts
to each and every cell on the map, which can then be viewed when browsing your
cell map later on.
The structure of a cell map is created by starting with a central cell and
linking other cells to it. Cells can be added in any of six directions. By
activating arrows, you can specify directional flow. Eight colors are available
for cell variation and to create patterns.
To create a new cell map, click Create
new cell map. After entering a title, you will be taken to the work area
and prompted to double-tap in the center to create a new cell. Once you have
have entered the text and designated the color, you can then double-tab to add
an adjacent cell on one of the sides. For each cell, you can add voice memos,
files, contacts, images, and videos.
When your cell map is completed, you can export it with all of the
attachments, export just the image, or export the cell map folder to iTunes.
Cell Storming is a fairly intuitive app. It took me a few minutes to figure
out the various features, but now I can navigate around fairly quickly. One of
the aspects of Cell Storming that I like is the simple fact of the
differentiation from other more traditional mind map apps.
If you like mind mapping, you will definitely like Cell Storming.
Use the Genius Scan app to scan from anywhere and share the files as images or PDFs to the cloud or others.
My family tells me that I am extremely organized when it comes to my planning journal, but far less organized and unstructured (aka messy) when it comes to the physical world. It is true, I have to admit. I have a tendency to allow papers and projects to pile up on my desk. When my desk gets too cluttered, I will expand my collection to the drawers. However, recently, I have really made an effort to digitize as much as possible and minimize the need for physical organization of files and paperwork.
Genius Scan
One of the tools that I use to help with in the process of digitizing information is an app on my iPhone called Genius Scan. I have used Genius Scan for years as a way to scan on the go. The quality of smart phone cameras is excellent, and you can obtain high quality scans of documents quite easily.
Genius Scan, developed by The Grizzly Labs, promises to be "a scanner in your pocket," and it is actually that convenient. Some of the examples provided by the developers for the use of Genius Scan include:
Equipping employees for scanning from remote locations for contracts, training handouts, and brainstorming documents
Providing a convenient way to scan receipts from travel
Decluttering work areas (as I discussed above) by digitizing paperwork
The export screen for PDF
How to use the app
To use Genius Scan, simply take a photo of a document or select an existing photo. The app will prompt you for the boundaries of the document. The document will corrected with options for a black-and-white scan or a color scan. Once scanning is complete you can share the document with others via e-mail or text or upload the document to a cloud storage solution like Google Drive or DropBox.
How I use Genius Scan
Usually, I save documents to folders on DropBox. I have a folder for maintenance so I no longer have to save the multi-page paper receipts from the car dealer and the exterminator. I also have a document saved within the Genius Scan app to capture any business cards given to me. When my daughter's high school grades arrived in the mail today, I scanned the paper and tossed it.
At the end of each year, I review my journal and use Genius Scan to capture any notes from both the weekly pages and the notes section if I believe I will want to reference the information later.
While many apps exist for scanning documents, I encourage you to check out Genius Scan. The full version of the app is $6.99 but it is worth it.
In this post I describe how I use Canva to create headers for blog posts.
Headers with images
If you look through the design style of my posts from 2011 until now, you will see some changes through the years. Currently, I am trying to add image headers to each post.
You can only share to Pinterest if a post contains images.
Including an image on a post ensures that Facebook will recognize the correct image when you share a post.
Using headers can be a way to grab attention while conveying the theme of the post.
Canva
Canva is mostly free graphic design site created for those with limited graphic design experience. The motto of Canva is "empowering the world to design." At the time of this writing, over 54 million designs have been created by 7.3 millions users since Canva launched in 2013.
Canva contains libraries of designs, fonts, images, and layouts. Additionally, Canva features photo filters and icons/shapes. Canva is "mostly free" because a small charge is leveraged for certain design elements such as photos and other graphics. There is also a Canva for Work option, a subscription service.
The different types of designs are categorized as follows:
Social media posts
Documents
Blogs/e-books
Marketing materials
Social media/e-mail headers
Events
Ads
Basic layout
Canva is easy to use. For my blog headers, I simply navigate to the Canva website and select the Twitter Post. Once the blank canvas opens up, I import my selected background photo (usually from Flickr), find a select text style, and modify the text.
Downloading designs
Once I have designed to my satisfaction, I save the download the image as a JPG. Four options are available for downloading. If you use any Canva-provided images that must be purchased, the downloaded versions will include a watermark prior to purchasing the images.
For my blog, I upload the design while creating the post.
Have you used Canva? If not, I encourage you to give it a try.
The contents of my travel bag serve as my office away from home.
Back in the days when I occasionally toured with a small contemporary Christian trio, I learned that I need to take everything with me that I might need. I hauled keyboard stands, amplifiers, keyboards, cables, and power strips. The only provided service that I expected was power. Once I played for a wedding out in the woods and had to wire up a small lawnmower battery in order to provide power.
I have applied the same lessons to my office travel bag. Over time I have accumulated the various items that I use in my home office. It is nice to just grab my travel bag and go.
A bag story
A few years ago I decided that I wanted a leather travel bag. I wrote out all of the requirements: leather, cost less than $200, plenty of pockets for cables, pens, and storage, a zip top instead of a messenger-style bag, and a few other specifications. I found a manufacturer in China that sells directly to consumers. I ordered my bag and thought I was fairly happy with it.
However, my wife didn't particularly care for it, so she gave me what was, admittedly, a much nicer Coach men's bag. It was smaller than my Chinese leather bag, but I really liked it.
After a while, though, I realized that I needed something with more storage. I sold the Coach bag on eBay and bought an Alpha Bravo Andersen Slim Commuter Brief from TUMI. Instead of leather, I selected the ballistic nylon.
This bag has worked well for me, and has accompanied me on trips across the United States.
The contents
The version of the bag that I have has two small pockets, a large pocket for papers, a second large pocket designed for a laptop, and a back pocket for flat items. Inside the bag, there is also space for a tablet and a series of pockets for pens and business cards.
I keep the following items in my bag:
Mac computer with small mouse and power cable
iPad with power cable
Adapters for both Mac and iPad for VGA and HDMI
Notepad for brainstorming
Moleskine journal as my planner
Watercolor pencils for my planner
A random collection of pens
Earbuds
Do you have an office travel bag? What are the essentials that you must take with you?
This post contains a behind-the-scenes look at apps I used to create a tutorial video.
In yesterday's post, I shared a video that I created on how to enable the text to speech feature available in the Apple iOS operating system for iPhone and iPad. I have found the ability to listen to my written text very beneficial. It helps me catch grammatical and flow errors.
Rather than upload several screenshots to illustrate the process, I decided to record a video which included a demonstration of the text to speech feature in action.
My first step was to make an audio recording of Moira (my selected voice) reading a portion of the Gettysburg address. I recorded this using the Voice Record Pro app, installed on my iPhone. I connected the microphone to my iPhone and recorded while Moira spoke on my iPad.
Next I created two video segments using the Reflector app. The first segment consisted of configuring the settings for enabling text to speech. The second segment was for the demonstration itself. I then created the introduction using IntroDesigner app.
I sequenced the video segments in iMovie, recorded the voice over (several times), and added some background music.
Apps
Voice Record Pro 7 (VRP7) is a professional voice recorder which allows you to record voice memos and on-site sounds at unlimited length with configurable quality. It can record in MP4, MP3, and WAV formats. I frequently use VRP7 to record music performances. It is available for $2.99 on the US app store.
Reflector 2 is a wireless mirroring and streaming receiver that allows you to mirror iPad and iPhone displays on a computer. It is available for Mac, Windows, Android, and Amazon Fire TV. Once the Reflector app is installed on the computer, it is easy to send the iPhone screen via Air Play with mirroring enabled. Reflector is available for $14.99.
IntroDesigner is an easy-to-use app to create introductions for videos. Designed to work with iMovie, I first create an intro and save it into the camera roll. There are a variety of templates available, and all text is editable. Using iMovie, I insert the intro at the beginning of the video. IntroDesigner is available on the US app store for $3.99.
iMovie, developed by Apple, is the intro-level app for creating video projects on Apple devices. I have it installed on my iPhone, iPad, and Mac. However, I prefer to use my iPad for most video projects because I find the interface more intuitive than on the Mac. iMovie is $4.99 in the US app store.
Hardware
In addition to a variety of apps, I used a special microphone to record the demonstration of Moira reading and also for my voice over. I have experimented with a variety of expensive and inexpensive mics to create better audio for voice overs on my iPhone. The Miracle Sound Deluxe Lavalier Lapel Clip-on Omnidirectional Condenser Microphone is extremely portable and connects directly to a smart phone. It is available on Amazon for $17.99.
Despite owning these apps for a while, this was the first demo video I made in this style. I found the process fairly easy and enjoyable, and hope to make more tutorial videos in the future.
I encourage you to check out these apps, download what you are comfortable purchasing, and start creating.
Use the text to speech feature built in to the Apple iOS accessibility options to play back written text in a variety of voices.
Text to speech
Recently I posted on how to improve your writing in ten easy steps. Step number 8 on my list is to use a text to speech application to play back your written text. When proofreading your own writing it is very easy to skip over grammatical errors. You could also read your own writing aloud, but you may still miss a variety of errors. Finding someone else to read your writing back to you may also be challenging. The best solution is to use an app of some sort to do this.
Once I learned that text to speech was an option, I searched the app store to see what apps existed. Several different apps can be downloaded. While many of these are free to install, they frequently include desirable in-app purchases.
While searching online, I discovered that the Apple iOS operating system for iPhone and iPad includes a text to speech feature under the accessibility options. Accessibility is designed for those who are visually or hearing impaired. For the hearing impaired, options exist to flash the light when the phone rings. For the visually impaired, options exist to speak menu options and read back text.
Activating text to speech
Enabling the Speak Selection feature is easy. First, open Settings and then choose General. Select Accessibility and press Speech.
In the Speech section, ensure that Speak Selection is activated (switched to on). Use the slide in the Speaking Rate section to adjust the playback speed of the text. Select the Voices option to choose voices for different languages. For English, I downloaded the Irish voice, Moira. Siri, the iPhone's voice, is capable of switch languages. My wife and I experimented with paragraphs of text in English and Korean; Siri switched languages seamlessly.
Use these shortcuts to be more productive when using your Mac computer.
My switch to Mac
For years I was a Windows operating system personal computer user. However, after a series of laptops that consistently overheated following about two years of use, I decided that I was ready to switch to an Apple Mac computer.
This transition was already well underway for me because I had already started using an iPhone, and then added an iPad to the mix. Thus, switching to the Mac completed the Apple puzzle.
I love the Mac. The power-up time is fast, and when the computer is asleep, pressing the power button instantly brings it to life. Because the hard drive is solid state, there are no moving parts.
Any type of change takes time. Switching to Mac required me to become familiar with new screen layouts, file organization, and keyboard shortcuts. You can easily search the Internet for keyboard shortcuts for both Windows and Mac operating systems.
Keyboard shortcuts
There are numerous keyboard shortcuts for Mac. Many apply across all applications on the Mac operating system. There are other shortcuts that are app specific. The shortcuts below are, in my opinion, essential ones to use all the time.
General keyboard shortcuts
Letters with accents: Hold down a letter to reveal accented letters. For example, a document detailing educational and work experience is a résumé, not a resume.
Emoji and Symbols: Click Edit on the menu bar and select Emoji & Symbols. You can also hold down Control+Command+space bar simultaneously. 😀
Delete a character to the right: Press Control+D or Fn+Delete.
Navigate to the top of a document or page: Fn+← (Fn+left arrow).
Navigate to the end of a document or page: Fn+→ (Fn+right arrow).
En dash: Option+dash. The en dash is used to indicate a range of dates (1941–1945) or page numbers or to set apart some text – that is, for emphasis or interruption – to draw attention to it. The en dash usually has spaces on either side when using in a sentence (dates do not use the extra spaces).
Em dash: Shift+Option+dash. The em dash is preferred by many editors—according to many style guides—for inserting statements of emphasis or interruption. It can also be used to attribute a quote. For example, "All I am, or hope to be, I owe to my angel mother ." —Abraham Lincoln.
Use these task list indicators to monitor your progress when completing tasks.
Advantages of Tracking Task Progress
While it is possible to keep track of tasks on your smartphone, I prefer to use a paper-based planner for my tasks. Several advantages to using a paper list include:
Tasks that have been acted upon are still visible, permitting you to track the evolution of a task from initially added to a list to eventually deleted, delegated, or canceled.
By adding status indicators to tasks, you can track the progress of each task.
You can view a completed list of tasks and feel satisfied at a job well done.
Additionally, you can use task lists to review categories of tasks in order to monitor and improve performance.
Below are six variations of task list status indicators. The first four sets are ones that I have come across in my Internet journeys. The last two sets are the ones that I use every day.
From the BulletJournal website: "The Bullet Journal is a customizable and forgiving organization system.
It can be your to-do list, sketchbook, notebook, and diary, but most
likely, it will be all of the above. It will teach you to do more with
less."
FranklinCovey is a productivity company focused on performance improvement. According to the company's website, "We help organizations achieve results that require a change in human behavior." Co-founded by Stephen Covey, much of the content is based on Covey's book, The 7 Habits of Highly Effective People."
In the Sketchnote Workbook, Mike Rohde walks readers through specific ways to enhance visual notes and organization.
Unknown Source
I recently came across this set of indicators, but was unable to relocate the source for this post. However, I wanted to include it because it is slightly different than those included thus far. The small circles remind me of the achievement tests I had to take in school and of the satisfaction of filling in each circle completely with my #2 pencil.
My Indicators for Tasks
As I have previously written in a post on my DIY planner, I dedicate one section of my weekly planning pages to tasks. My set of indicators is modified from the FranklinCovey indicator list.
My Indicators for Tasks in Notes
In a separate section of my weekly planning pages, I also have space for notes from meetings, observations, and other interesting tidbits. When taking notes from various meetings, I usually use some sort of bullets to record each agenda item. If an action item is assigned to me - or I assign it to myself - I use the status icons below to ensure that it stands out from the routine agenda items.
I also use this set of icons when making notes on handouts or other documents. In these situations, I usually create a task list on the first page of the document.
You have probably noticed that this set of indicators is similar to Unknown set displayed above. Since I've been using this set for several years, it is always interesting to find similar approaches to tasks from across the world.
Track Your Tasks
If you are already using a system to track your tasks, please comment below and let me know what your system is and how well it is working. If you need a system to help improve your approach to tasks, I encourage you to try one or all of these sets to see which one works best for you. Let me know how it goes by commenting below.